Configuring a SteelSeries Rival 500 from the command line using `rivalcfg`
I recently swapped from running Windows 10 to NixOS on my gaming PC. Along the way I thought I’d backed up my mouse settings locally and/or that SteelSeries cloud sync would have my back if I didn’t.
And wouldn’t you know it…that turned out to be horrible assumption by past-me. Those assumptions both turned out to be false and I learned that after starting to dual boot Windows & Linux again. I wanted to do some Windows-only multiplayer games and found out that my local backup wasn’t complete and the cloud sync option wouldn’t enable.

Rebuilding all of those profiles again is/was going to take time and I’m NOT buying into their products anymore. I found rivalcfg and realized I could just write my own profiles and swap them on the fly using scripts and other hooks as needed.
What I have below are a bunch of different profile snippets or other code bits I found useful while reprogramming my Rival 500 w/ crossplatform profiles using rivalcfg. This isn’t a complete set of instructions but just enough to jog my own memory in the future of what I was doing in the past.
rivalcfg installation
#
NixOS #
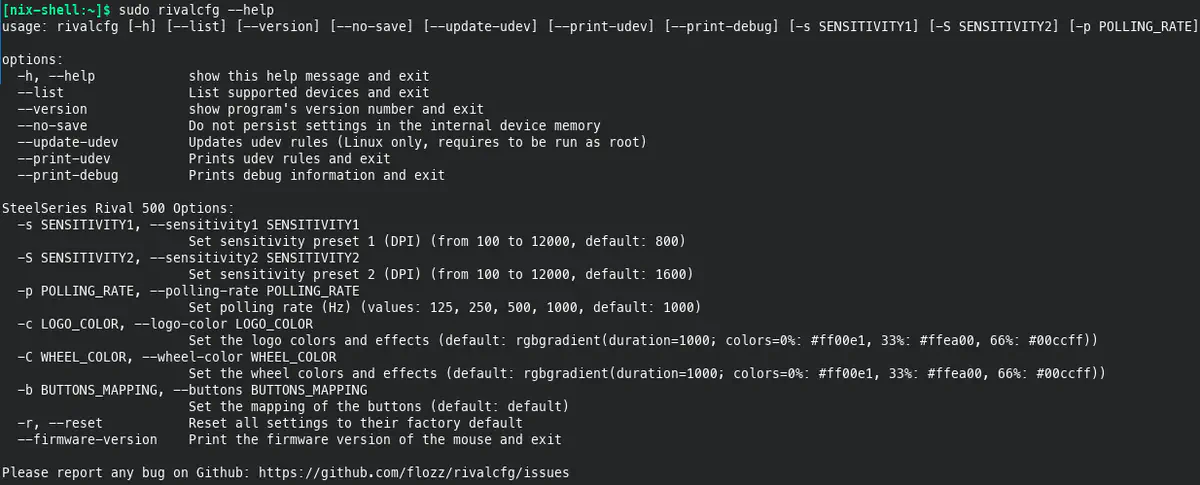
You could add this to your config somewhere or temporarily invoke a nix-shell or whatever. Here is a quick snippet to drop into a shell w/ rivalcfg available:
nix-shell -p rivalcfg
My Custom Settings & Profiles #
Common Settings #
# I don't really use the DPI switching much.
# I'd rather use that button for something in a game/app TBH.
# *SOME* games I will turn the DPI toggle back on though. 🕹️
rivalcfg -s 800 -S 800

# Turn off the LEDs. I don't mind 'em on some things, but
# not on all the time, thanks. 🕶️
rivalcfg -c black -C black

# Turn down the polling rate to 250Hz instead of 1000.
# Some of the higher polling rates seem to cause issues w/
# hardware lockup or in-game FPS drops for some things.
# Noteably I think Left 4 Dead had issues w/ mouse polling rates > 500Hz
rivalcfg -p 250
Rival 500 Button Map + Default Binds #
This is what the default button map looks like for the Rival 500. This was originally created by Flozz and there is a link below to the source of this SVG. I’m going to edit this image to reflect some of my own profiles further below. I’ve also optimized it a bit to use inside my blog post here.
# A template for changing the button binds. Adapted
# here for easier reading/multiline editing. (the `\` is important)
rivalcfg -b "buttons(
  layout=QWERTY;\
  button1=default;\
  button2=default;\
  button3=default;\
  button4=default;\
  button5=default;\
  button6=default;\
  button7=default;\
  button8=default;\
  button9=default;\
  button10=default;\
  button11=default;\
  button12=default;\
  button13=default;\
  TiltLeft=default;\
  TiltRight=default;\
)"
Personal Default Binds #
My default binds. Probably not that useful to anyone but me but feel free to take/adapt as needed for your own adventures. This effectively shuffles the thumb buttons to move the forward/backward generic mouse buttons closer to where my thumb naturally rests.
Button 9 -> Button 4- Button 4 is the generic browser “back” button.
Button 4 -> Button 5- Button 5 is the generic browser “forward” button.
Button 5 -> Button 9- Button 9 isn’t recognized in a ton of games but for those that do, I keep this available.
rivalcfg -b "buttons(
  layout=QWERTY;\
  button1=default;\
  button2=default;\
  button3=default;\
  button4=button5;\
  button5=button9;\
  button6=default;\
  button7=default;\
  button8=default;\
  button9=button4;\
  button10=default;\
  button11=default;\
  button12=default;\
  button13=default;\
  TiltLeft=default;\
  TiltRight=default;\
)"
Attributions #
https://github.com/flozz/rivalcfg/blob/master/doc/devices/images/rival_500_buttons.svg
The Default Rival 500 Button mapping was originally made by flozz under the DO WHAT THE FUCK YOU WANT TO PUBLIC LICENSE

